It's now possible to connect GoTallo to OpenAI, so incoming messages are automatically analysed.
This gives your team instant context on every message: the mood, intent, urgency, language, and more, without having to read between the lines themselves.
GoTallo uses a bring-your-own-key model, meaning you connect your own OpenAI account and API key. This gives you full control over usage and costs directly through your OpenAI account.
What does it do?
When a message comes in through a connected channel, GoTallo sends it to OpenAI for analysis. The results are stored as metadata on the message and are immediately available to agents and any logic built on top of them.
Default enabled metrics
-
Summary: a quick recap of what the message is about.
-
Intent: what the sender wants, such as to complain, ask a question, or just chat.
-
Sentiment: the general mood, such as positive, negative, or neutral.
-
Image Description: a text explanation of what is in the image (when applicable).
If you want to enable additional metrics, reach out to support@gotallo.com.
All available metrics
The Basics
-
Summary: a quick recap of what the message is about.
-
Message Type: whether it is text, an image, or both.
-
Language: the language used, such as English or Spanish.
-
Character Count: the total number of characters in the message.
Mood and Style
-
Sentiment: the general mood, such as positive, negative, or neutral.
-
Emotional State: specific feelings like frustration, gratitude, or confusion.
-
Tone: how the sender comes across, such as professional, friendly, or formal.
-
Formality: whether the writing style is official or casual.
-
Cultural Context: whether the message fits a Western, Eastern, or Global style.
Goal and Topic
-
Intent: what the sender wants, such as to complain, ask a question, or just chat.
-
Subject: the main category, such as finance, health, or technology.
-
Key Concepts: the most important topics mentioned in the message.
-
Urgency: how quickly the message needs a response, such as low, medium, or high.
Quality and Safety
-
Quality Scores: ratings for writing quality and grammar.
-
Complexity: how simple or difficult the message is to understand.
-
Spam and Fraud: whether the message looks like junk mail or a scam.
-
Profanity and Sensitivity: flags bad language or sensitive/private information.
-
Consistency: whether this message matches the sender's usual style.
Image Analysis
Only applicable when a message contains a photo.
-
Image Description: a text explanation of what is in the image.
-
Text in Image: any words or sentences found inside the picture.
-
Objects Detected: a list of things visible in the photo, such as "car" or "person".
-
Image Mood: the emotional feel of the visual.
-
Image Category: whether it is a document, a scene, a product, etc.
-
Image Quality: how clear or blurry the picture is.
How to configure
Step 1 — Create an OpenAI API key
You will need an OpenAI account and an API key before connecting GoTallo. If you already have one, you can skip to Step 2.
-
Go to platform.openai.com and sign in or create an account.
-
Navigate to the API keys section.
-
Click Create new secret key, give it a name, and confirm.
-
Copy the key and store it somewhere safe. OpenAI will not show it again after you close the dialog.
For more details, see the OpenAI API key documentation.
Step 2 — Add the service in GoTallo
-
Go to GoTallo Configuration in Salesforce.
-
Click Integrations and Webhooks in the left sidebar.
-
Click Add Service in the top right.
-
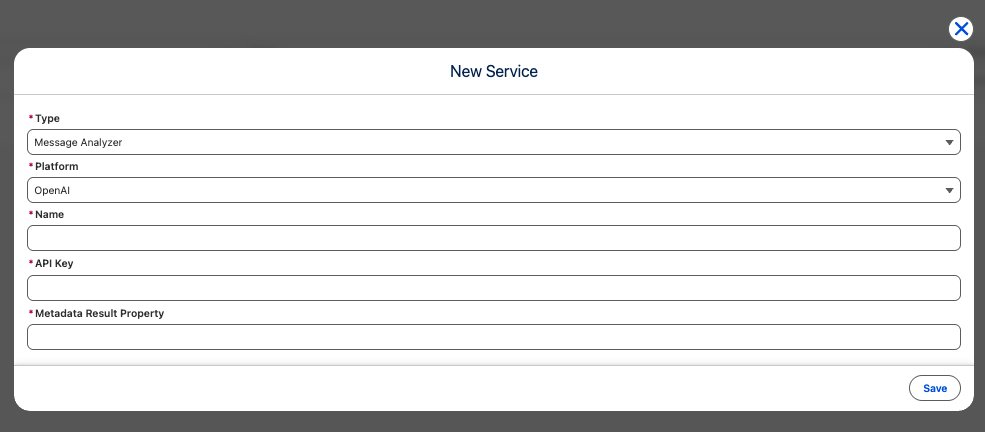
In the form that opens, fill in the following fields:
-
Type: select
Message Analyzer. -
Platform: select
OpenAI. -
Name: give the service a recognisable name, for example
GoTallo QA OpenAI. -
API Key: paste the API key you created in Step 1.
-
Metadata Result Property: enter the property name where the analysis results will be stored on the message.
-
-
Click Save.
Step 3 — Assign channels
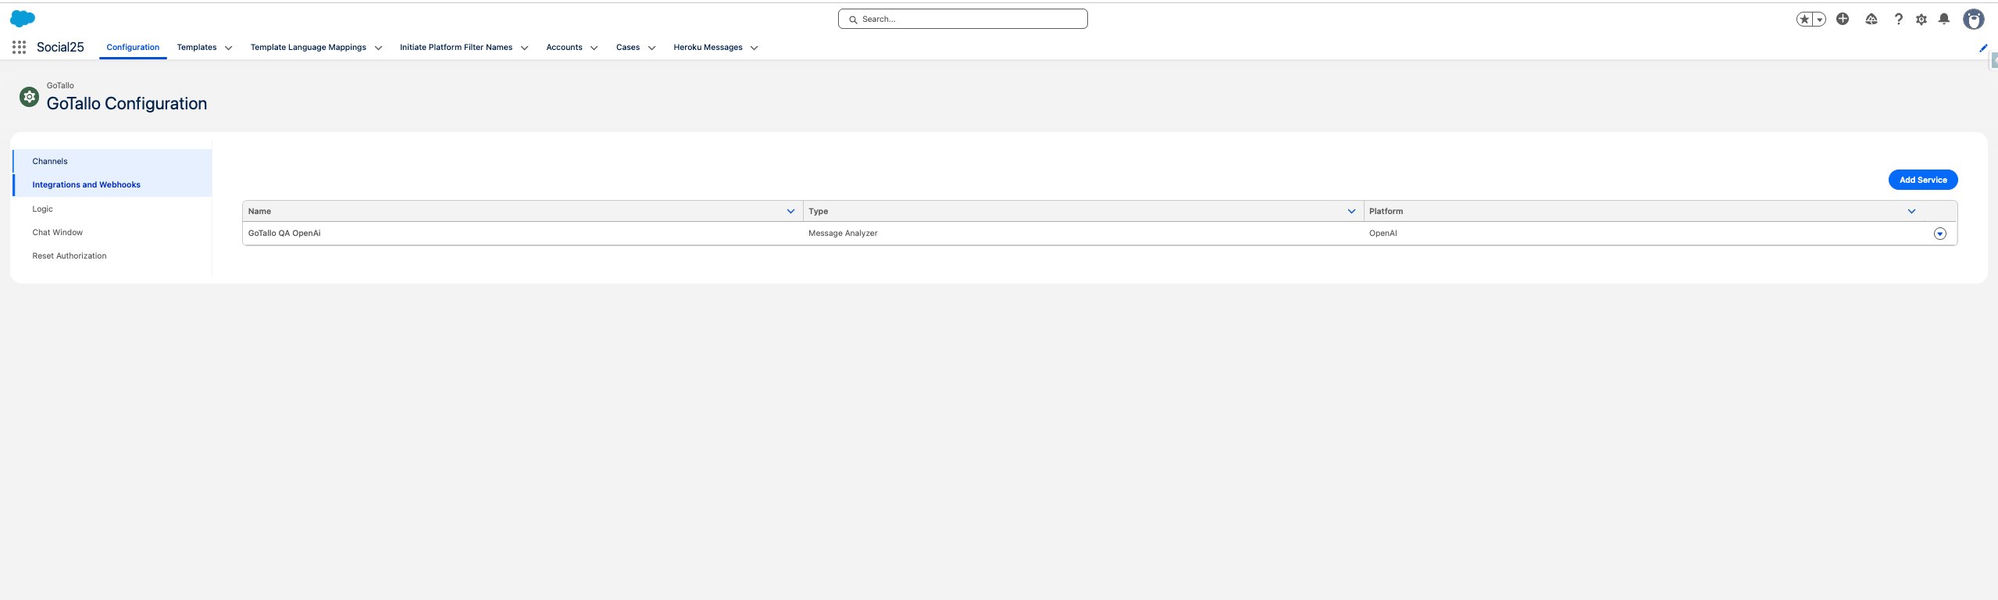
Once the service is saved, it will appear in the list on the Integrations and Webhooks page.
-
Click the dropdown arrow on the right side of the service row.
-
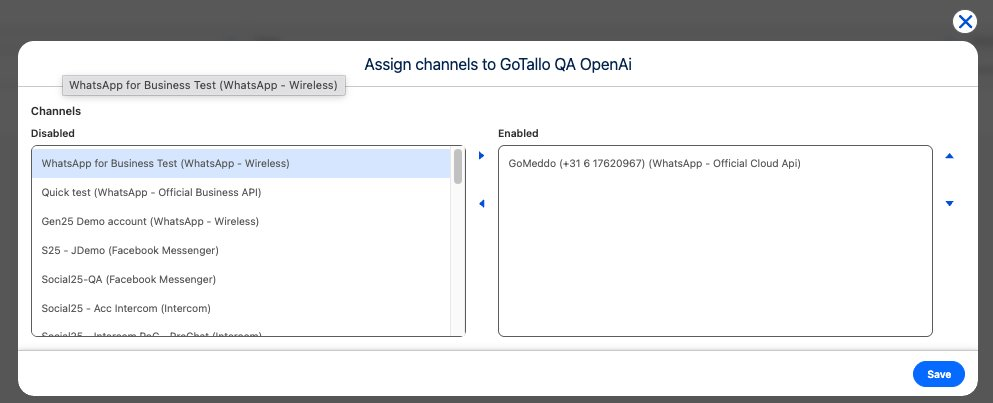
Select Assign Channels.

-
In the dialog that opens, move the channels you want to analyse from the Disabled list to the Enabled list using the arrow buttons.
-
Click Save.
From this point on, every incoming message on the enabled channels will be sent to OpenAI for analysis, and the results will be attached as metadata to the message.